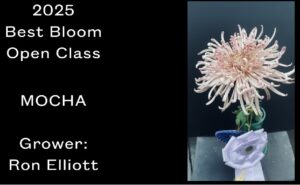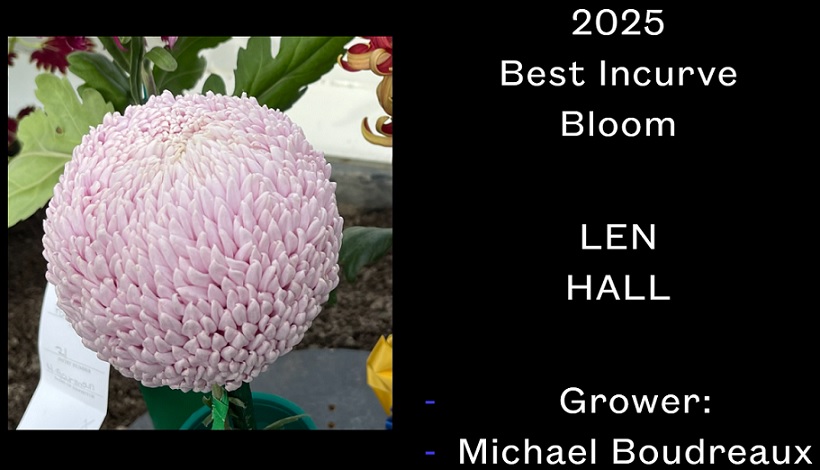
EVERGREEN CHRYSANTHEMUM ASSOCIATION
Seattle, Washington
ECAMumClub.org
Email us at: steve at ecamumclub dot org
MEETING OF THE ECA – THURSDAY September 12, 2013 at 7 PM at the Seattle Police Athletic Association Office (SPAA) site at 11030 East Marginal Way South, Tukwila.
SEPTEMBER MEETING – This is a very important meeting as we begin to prepare for our annual show at Furney’s which will take place on Oct 25 – 27 with set up on Oct 23rd.
UPCOMING EVENTS
Mark your calendars for the following events:
Puyallup Fair – September 6 – 22
Fall Show at Furney’s – October 25 – 27 (with set up on Oct. 23, 1 pm. Bloom Prep. Oct. 24)
Awards Banquet at Angelos– November 14
PUYALLUP FAIR Sept 6 – 22: – If you plan to exhibit flowers at the fair this year, you will need to pre-register online at the Puyallup Fair website www.thefair.com before Sept 4th. Go to entries and then floral. An entry schedule may be printed from there if you have computer access.
PLANT CULTURE and SUPPLIES: – The September meeting will devote time to the care and feeding of the blooms as they develop. Place orders for specific items with Don Stark or Gary Budzeak. Cultural recommendations are attached. With possible rain or showers consider your sheltering options for September as we move to the latter part of the growing season.
SEPTEMBER TO-DO LIST – drs 9-1-13
Once the buds have broken the membrane and some petal tips are showing it’s imperative to get the pots into or under some kind of shelter where they will remain through the final bloom is developed. The basic idea is to protect the blooms from rain or dew, provide adequate temperature control and ventilation. The watering and fertilization program must also be modified to assure proper bloom development, and lastly we need to continue with pest management and fungus control throughout the bloom development.
Housing/Sheltering:
Sheltering of your plants is necessary throughout the bloom cycle. Shelters come in a variety of sizes, names and shapes including porches, Large overhanging eaves, garages, car ports, green houses or temporary wood /plastic structures. Basic requirements are Shelter from rain, dew, & Winds; adequate daytime light (though it can be shady), or light supplements, temperature control, and ventilation.
Maximum temperature should be kept below 80 Deg. If possible. Above that temp. the probability of bloom damage due to petal rot is high. If the shelter is exposed directly to the sun in early Sept. days the temperature within can skyrocket. Big fans can be used to increase ventilation and keep the temperature down. The fans also hopefully can bring in air from the shady side of the shelter to cool the overall area as well. Lining the inside of the shelter roof with old sheets or muslin will also reduce the heating and filter the sunlight. In general I like to keep the temperature between 50 deg and 70 deg. F for most of the finishing, but for the last few weeks of October, letting the nighttime temperatures dip into the 40s will probably accelerate your bloom development. If your temperatures dip into the 30s you will probably get pinking on the edges of some blooms. You can contact Don Stark or Chris Brookes to discuss your specific shelter questions or ideas.
Lighting:
Considerably less light will be required during the bloom cycle, but never the less it is necessary to provide supplemental light in most cases where you have sheltered the plants. If you are finishing in a green house or similar structure, It will probably be necessary to add light filtration in the ceilings as the opening blooms generally can not accept full sunlight through clear plastic or glass. You can purchase black screen like materials to put over your roofs to reduce the amount of sunlight. Alternatively, I have pinned old white sheets across the ceiling to filter the light. This works very well and at the same time the sheets tend to absorb the early morning dew that tends to collect in the cool mornings.
Getting back to light supplements, the most common and functional method is hanging 4’ or 8’ Fluorescent light fixtures in the ceiling. Plain white light lights work or if you choose you can buy
Gro- lights which are reputed to be better. Don’t buy “Grow-Lux” lights unless you are very rich as they are a specific brand name light and very costly. You can run the lights all day, 8-10 hours, during the day or all night if you so chose. I prefer just the time during daylight hours. Another clue that might help is an old adage –In general reflexing varieties like it light and cool while Incurves usually like it warmer and and less light” I use that adage to help me decide where I want to house each plant since I Use more than just 1 housing unit.
Bringing the plants into cover
Around Labor day, when the buds are starting to break the membrane, bring them in. Wash the pots thoroughly around the bottom to get rid of the crud moss and residue that have formed in your growing area. Clip off all excess roots that are hanging out the drain holes and pick off all old and damaged leaves, mostly around the bottom of the plant, that harbor pests and fungi.
Spray the plant with both a good fungicide and insecticide, taking care not to get any of the spray on the blooms. Watch for and destroy Earwigs, worms, caterpillars etc. They can wreck blooms when they get on or inside.
Top-dress the pots for one last time. Add about ½ to ¾ in. of your 9” mix or some compost to the pot surface and level it. Top-Dressing the plants helps finishing the plants now and also promotes new growth for next year’s cuttings. Now’s the time to cut off (not tear out) all new basil shoots that are developing, If your pot exhibited significant moss growth , add ½ tsp of Hydrated lime to the top dress mix to help sweeten the soil.
Optionally for colored blooms, not white or yellow, you may add ¼ tsp of Ferrous sulfate (Fe2 So4 ) to enhance the color. In particular The Athabasca needs this Fe2,So4 to show a significant ring of pink tips on its blossom. Pinks in general look more intense if we feed it.
Additionally, if you have not started feeding potash in your fertilizer formula (see Aug. Newsletter) then add ¼ to ½ tspn Sulphate of potash to the top mix to harden off the plant and keep the bloom petals from being too soft.
Staking and bud support:
Now’s time to start cutting back to your final selection of laterals, Stake the securely and start getting the support shingles attached to the stem and the support stake. Stake and tie up all selected laterals and add support shingles under the blooms. Keep moving the support shingle up under the bloom as the neck stretches. Use support shingle to straighten the neck and keep the bloom flat atop the stem
Finally, remove all side laterals as they appear on the selected stems below the bloom so that the bloom is all that is left.
Fertilizing and Watering:
For the bloom cycle, we reduce the fertilizer to ½ strength immediately after taking the bud and at the same time switch to a different fertilizer formulation that is higher in Potash content as discussed in the August news letter. Basically we mix ½ tsp of our basic 20-9-20+ fertilizer with i/2 tsp with ¼ tsp of Sulphate of Potash per gallon of water. After the petals begin to drop it is safe to increase the strength of this solution gradually to up to 2 times or less of this formula to promote blossom growth. Note: It’s easy to overfeed the plant at this time, and produce ragged, cocked, or deformed blooms; so increase the fertilizer sparingly.
Watering is different at this stage also. Water more sparing using about 1pint per watering and do not water when the temperature is over 75 deg. Water /fertilize from a bucket using a 1-pint jar or similar small container. Do not use a hose and scatter water everywhere on the shelter floor. Keep the finishing area dry and clean.